In this tutorial we are going to have a lot of fun with iOS. Among other things you are going to learn:
- How to create a circular progress view in SwiftUI
- How to use SwiftUI inside of a UIKit application
- How to show an empty state screen on a UIKit table view if there are no records to display
- How to build an iOS app without a storyboard by modifying the SceneDelegate
- How to build an application using and MVC architecture
- How and why to build an application using an MVVM architecture
First we’ll need to create a new app in Xcode and remove the storyboard…
Video
Part 1
Create an App and Remove the Storyboard
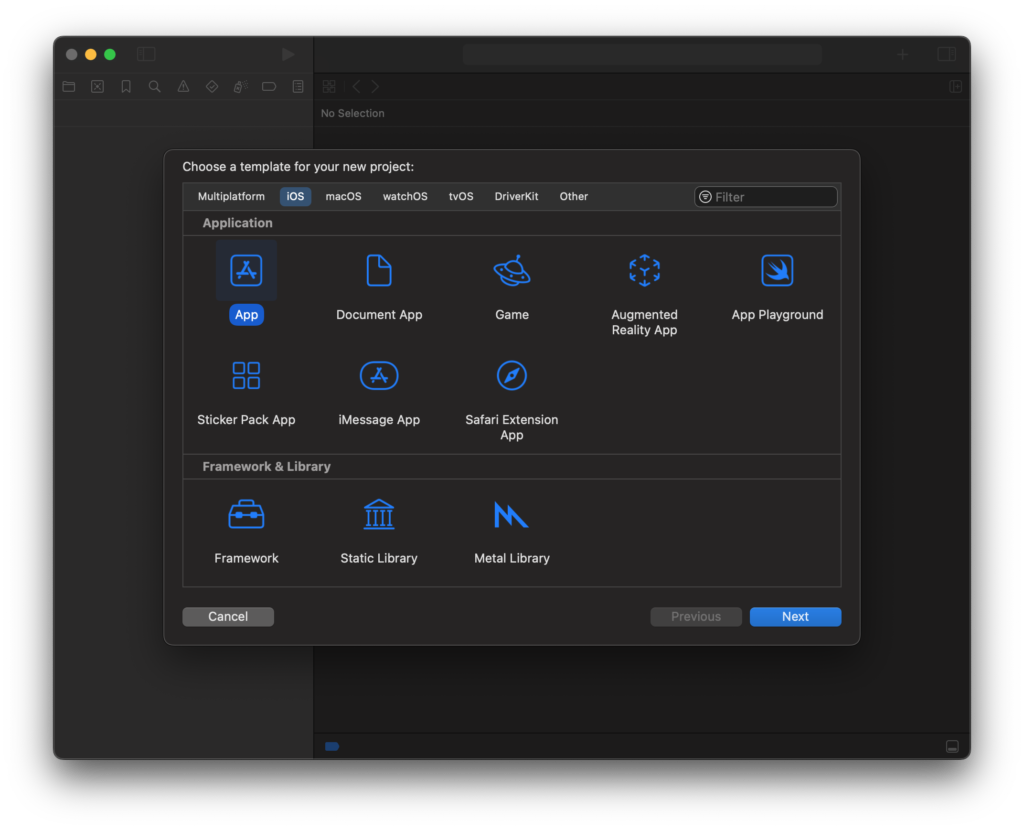
Jump into Xcode (I’m using Xcode 15.0) and go to File > New > Project and select App under the iOS template section. And name the app FastFast using Storyboard as the interface
Delete the Main.storyboard file and also delete the Storyboard Name row from your Info.plist. Also go to your app target Info tab and delete the Main storyboard file base name row.
Edit SceneDelegate.willConnectTo method to the following
func scene(_ scene: UIScene, willConnectTo session: UISceneSession, options connectionOptions: UIScene.ConnectionOptions) {
    // Use this method to optionally configure and attach the UIWindow `window` to the provided UIWindowScene `scene`.
    // If using a storyboard, the `window` property will automatically be initialized and attached to the scene.
    // This delegate does not imply the connecting scene or session are new (see `application:configurationForConnectingSceneSession` instead).
    guard let windowScene = (scene as? UIWindowScene) else { return }
    let window = UIWindow(windowScene: windowScene)
    window.rootViewController = UINavigationController(rootViewController: ViewController())
    window.makeKeyAndVisible()
    self.window = window
}Run the app you should not get any errors and will you will see a blank black screen.
Create Fasting Table View Controller
Right click on the FastFast folder in the file navigator and create two new groups in side your app: ViewController and View
Right click on the ViewController group and select New File > Cocoa Touch Class. Give it the name FastingViewController and have it be a subclass of UIViewController and select the Also create XIB file checkbox.
Move the FastingViewController.xib file to the View group that you create to separate the files. The FastingViewController.swift file will stay in the ViewController group.
Add an outlet and a cellId to FastingViewController.swift:
class FastingViewController: UIViewController {
    private let cellId = "fastCell"
    @IBOutlet private weak var tableView: UITableView!

    override func viewDidLoad() {
        super.viewDidLoad()

        configureTableView()
    }

    override init(nibName nibNameOrNil: String?, bundle nibBundleOrNil: Bundle?) {
        super.init(nibName: nibNameOrNil, bundle: nibBundleOrNil)
        self.title = "MVC"
    }

    required init?(coder: NSCoder) {
        fatalError("init(coder:) has not been implemented")
    }

    // MARK: - View Setup
    func configureTableView() {
        tableView.register(FastCell.self, forCellReuseIdentifier: cellId)
    }
}Extend FastingViewController as a UITableViewDelegate and a UITableViewDataSource. Add the following to the bottom of FastingViewController.swift
extension FastingViewController: UITableViewDelegate {
    func tableView(_ tableView: UITableView, didSelectRowAt indexPath: IndexPath) {
        tableView.deselectRow(at: indexPath, animated: true)
    }
}

extension FastingViewController: UITableViewDataSource {
    func numberOfSections(in tableView: UITableView) -> Int {
        return 1
    }

    func tableView(_ tableView: UITableView, numberOfRowsInSection section: Int) -> Int {
        return 100
    }

    func tableView(_ tableView: UITableView, cellForRowAt indexPath: IndexPath) -> UITableViewCell {
        let cell = tableView.dequeueReusableCell(withIdentifier: cellId, for: indexPath)

        // Configure the cell...
        cell.textLabel?.text = "Hello World"
        cell.detailTextLabel?.text = "Todays a great day!"

        return cell
    }

    func tableView(_ tableView: UITableView, titleForHeaderInSection section: Int) -> String? {
        "Fasting History"
    }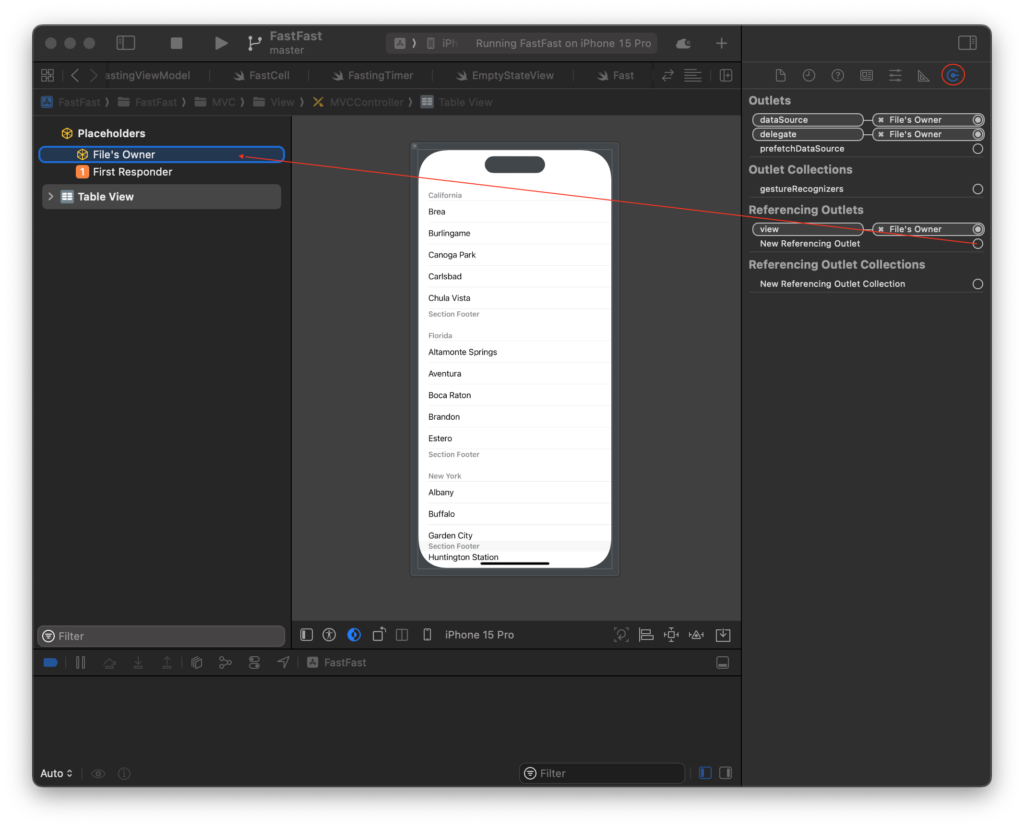
}Change the view inside FastingViewController.xib to a table view and connect the table view datasource, delegate, and referencing outlet:
Lets create a subclass of UITableViewCell to get this to work.
Create a new group in your app group called Components and create a new file called FastCell.swift
import UIKit

class FastCell: UITableViewCell {
    override init(style: UITableViewCell.CellStyle, reuseIdentifier: String?) {
        super.init(style: .subtitle, reuseIdentifier: reuseIdentifier)
    }

    required init?(coder: NSCoder) {
        fatalError("init(coder:) has not been implemented")
    }
}This cell will allow us to set a subtitle on our table view cells.
Create Data Models
Create a new group inside your project called Model and a new file called Fast.swift:
import Foundation

struct Fast: Equatable {
    let startDate: Date
    let selectedFastLengthSeconds: Int
    let endDate: Date?

    var dateString: String {
        let dateFormatter = DateFormatter()
        dateFormatter.dateStyle = .medium
        dateFormatter.timeStyle = .short
        return dateFormatter.string(from: startDate)
    }

    var elapsedString: String? {
        guard let endDate else { return nil }
        return DateUtil.elapsedString(start: startDate, end: endDate)
    }
}In order for this to work we also need to create a DateUtil helper struct.
Create Date Utility Struct
Create a new group in your app directory called Util and add a new swift file called DateUtil
import Foundation

struct DateUtil {
    static let FIVE_SECONDS = 5
    static let FOUR_HOURS_IN_SECONDS = 4 * 60 * 60
    static let EIGHT_HOURS_IN_SECONDS = 8 * 60 * 60
    static let TWELVE_HOURS_IN_SECONDS = 12 * 60 * 60
    static let SIXTEEN_HOURS_IN_SECONDS = 16 * 60 * 60
    static let TWENTYFOUR_HOURS_IN_SECONDS = 24 * 60 * 60

    static func elapsedString(start: Date, end: Date = Date()) -> String {
        let calendar = Calendar.current
        let components = calendar.dateComponents([.hour, .minute, .second], from: start, to: end)

        var timeDifferenceString = ""

        if let hours = components.hour {
            timeDifferenceString += "\(hours)h "
        }

        if let minutes = components.minute {
            timeDifferenceString += "\(minutes)m "
        }

        if let seconds = components.second {
            timeDifferenceString += "\(seconds)s"
        }

        return timeDifferenceString.trimmingCharacters(in: .whitespaces)
    }
}This helper method will take two dates and return the difference as a string in the format “1h 35m 15s”.
Integrate Models in View Controller
Let’s also add this model to our FastingViewController:
class FastingViewController: UIViewController {
    private let cellId = "fastCell"
    @IBOutlet private weak var tableView: UITableView!

    private var fasts: [Fast] = []
// ...Next lets create a create some SwiftUI views.
Create SwiftUI Components
We’re going to create two SwiftUI components. One called FastingTimer which will contain a fasting circular progress view, a fast length picker, and a start and stop button.
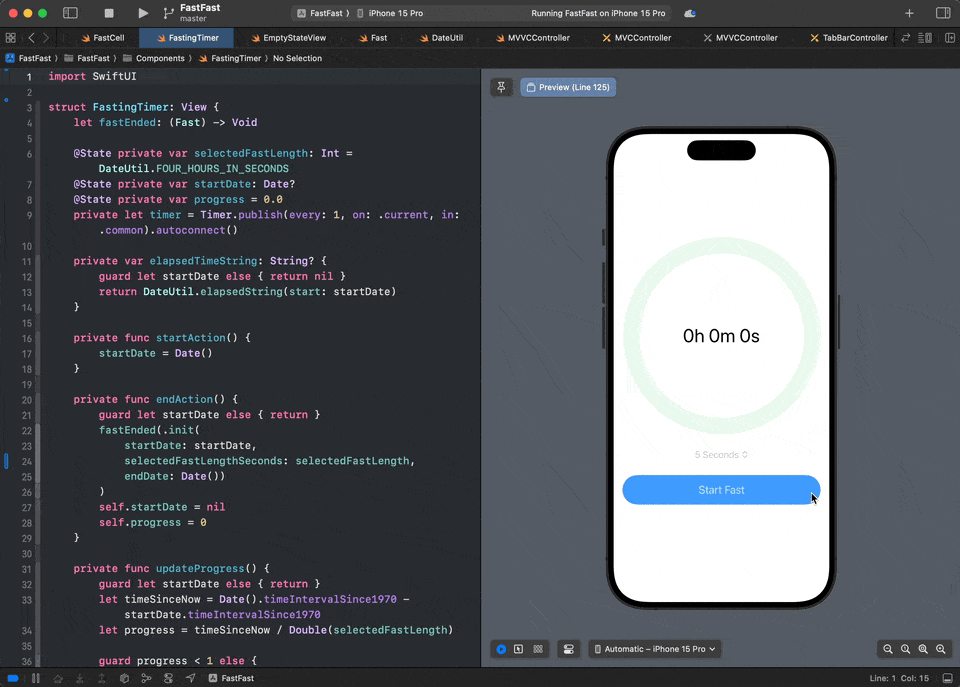
Inside the Components group create a new file called FastingTimer.swift:
import SwiftUI

struct FastingTimer: View {
    let fastEnded: (Fast) -> Void

    @State private var selectedFastLength: Int = DateUtil.FOUR_HOURS_IN_SECONDS
    @State private var startDate: Date?
    @State private var progress = 0.0
    private let timer = Timer.publish(every: 1, on: .current, in: .common).autoconnect()

    private var elapsedTimeString: String? {
        guard let startDate else { return nil }
        return DateUtil.elapsedString(start: startDate)
    }

    private func startAction() {
        startDate = Date()
    }

    private func endAction() {
        guard let startDate else { return }
        fastEnded(.init(
            startDate: startDate,
            selectedFastLengthSeconds: selectedFastLength,
            endDate: Date())
        )
        self.startDate = nil
        self.progress = 0
    }

    private func updateProgress() {
        guard let startDate else { return }
        let timeSinceNow = Date().timeIntervalSince1970 - startDate.timeIntervalSince1970
        let progress = timeSinceNow / Double(selectedFastLength)

        guard progress < 1 else {
            self.endAction()
            return
        }
        self.progress = progress
    }

    private var isFasting: Bool {
        startDate != nil
    }

    var body: some View {
        VStack(spacing: 20) {
            ZStack {
                circleProgressBackgroundView
                circleProgressView
                elapsedTime
            }
            .padding(.horizontal)
            .padding(.bottom, 15)

            Picker("Fast Length", selection: $selectedFastLength) {
                Text("5 Seconds").tag(DateUtil.FIVE_SECONDS)
                Text("4 hours").tag(DateUtil.FOUR_HOURS_IN_SECONDS)
                Text("8 hours").tag(DateUtil.EIGHT_HOURS_IN_SECONDS)
                Text("12 hours").tag(DateUtil.TWELVE_HOURS_IN_SECONDS)
                Text("24 hours").tag(DateUtil.TWENTYFOUR_HOURS_IN_SECONDS)
            }
            .pickerStyle(.automatic)
            .disabled(isFasting)

            Button(action: isFasting ? endAction : startAction) {
                Group {
                    Spacer()
                    if isFasting {
                        Text("End Fast")
                    } else {
                        Text("Start Fast")
                    }
                    Spacer()
                }
                .padding(.vertical, 8)
                .font(.title3)
            }
            .buttonStyle(.borderedProminent)
            .cornerRadius(35)
            .tint(isFasting ? Color.red : Color.blue)
        }
        .padding()
        .onReceive(timer, perform: { _ in
            withAnimation {
                self.updateProgress()
            }
        })
    }

    private var elapsedTime: some View {
        Group {
            if let elapsedTimeString {
                Text(elapsedTimeString)
            } else {
                Text("Press Start")
            }
        }
        .font(.largeTitle)
    }

    private var circleProgressView: some View {
        Circle()
            .trim(from: 0, to: progress)
            .stroke(
                Color.green,
                style: .init(
                    lineWidth: 30,
                    lineCap: .round
                )
            )
            .rotationEffect(.degrees(-90))
    }

    private var circleProgressBackgroundView: some View {
        Circle()
            .stroke(
                Color.green.opacity(0.1),
                lineWidth: 30
            )
    }
}

#Preview {
    FastingTimer(fastEnded: {_ in})
}
If you go to the editor menu and check Canvas. You will see a preview of the view show
Lets also add an Empty State View for when there are no fasts created yet. Create a new file in Components called EmptyStateView:
import SwiftUI

struct EmptyStateView: View {
    let title: String

    static func makeView(title: String) -> UIView {
        let vc = UIHostingController(rootView: EmptyStateView(title: title))
        return vc.view
    }

    var body: some View {
        Text(title)
    }
}

#Preview {
    EmptyStateView(title: "No Fasts Found")
}This will create a view to show a text label. The interesting method is makeView(title: String). It can be called like EmptyStateView.makeView(title: "No Fasts") and it will transform the SwiftUI view and return a UIView!
Integrate SwiftUI Components into UIKit Table View
Back in our FastingViewController lets add the fasting view to the table view:
override func viewDidLoad() {
    super.viewDidLoad()

    configureTableView()
    configureHeaderView()
}

func configureHeaderView() {
    let hostingController = UIHostingController(rootView: FastingTimer(
        fastEnded: self.fastEnded
    ))
    tableView.tableHeaderView = hostingController.view
    tableView.tableHeaderView?.frame = .init(x: 0, y: 0, width: 0, height: 420)
}

private func fastEnded(_ fast: Fast) {
    fasts.append(fast)
    tableView.beginUpdates()
    tableView.insertRows(at: [IndexPath(row: fasts.count - 1, section: 0)], with: .automatic)
    tableView.endUpdates()
}And change the cellForRowAt table view data source method in FastingViewController
func tableView(_ tableView: UITableView, cellForRowAt indexPath: IndexPath) -> UITableViewCell {
    let cell = tableView.dequeueReusableCell(withIdentifier: cellId, for: indexPath)

    // Configure the cell...
    let fast = fasts[indexPath.row]

    cell.textLabel?.text = fast.dateString
    cell.detailTextLabel?.text = fast.elapsedString

    return cell
}Add the Empty State View to Table View
We will set the table view footer view to our empty state view to show and hide if there are not fasts available. Modify the configureTableView method on FastingViewController
func configureTableView() {
    tableView.register(FastCell.self, forCellReuseIdentifier: cellId)
    tableView.tableFooterView = EmptyStateView.makeView(title: "No Fasts Yet")
    tableView.tableFooterView?.frame = .init(x: 0, y: 0, width: 0, height: 150)
}Update Table View Data Source
Let’s add code to show the correct rows for fasts and show/hide the empty state view if needed
extension MVCController: UITableViewDataSource {
    // ...

    func numberOfSections(in tableView: UITableView) -> Int {
        return 1
    }

    func tableView(_ tableView: UITableView, numberOfRowsInSection section: Int) -> Int {
        tableView.tableFooterView?.isHidden = fasts.count > 0
        return fasts.count
    }

    // ...
}Add Methods to View Controller to Delete Fasts
Now let’s add methods to support deleting fasts
extension MVCController: UITableViewDataSource {
// ...
func tableView(_ tableView: UITableView, commit editingStyle: UITableViewCell.EditingStyle, forRowAt indexPath: IndexPath) {
if editingStyle == .delete {
fasts.remove(at: indexPath.row)
tableView.beginUpdates()
tableView.deleteRows(at: [.init(row: indexPath.row, section: 0)], with: .automatic)
tableView.endUpdates()
}
}
// ...
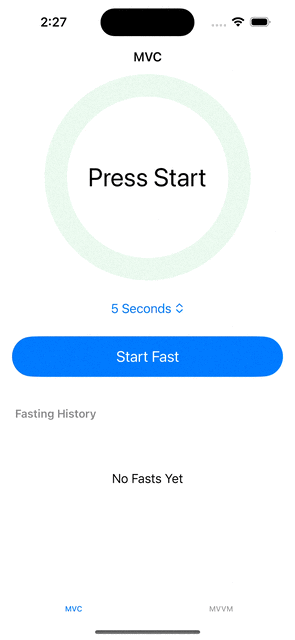
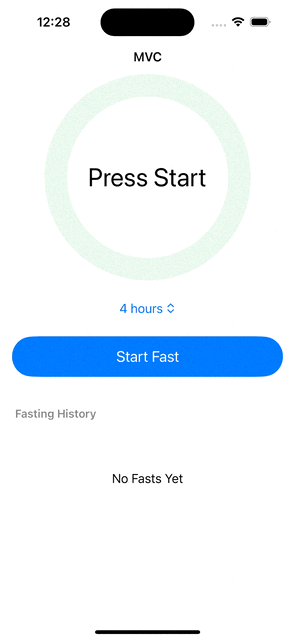
}This build an run the application and you will see:
Part 2
Refactor to MVVM
In part 1 we build a simple fasting application using a Model, a view, and a view controller. All of the code to manage adding and removing Fasts was put inside of our FastingViewController. What we want to do now is extract the logic that doesn’t involve UI related code to a new file called a ViewModel and allow the ViewController to only handle view related logic.
In MVVM we will move the logic to work with our models out of the view controller and into their own class that will be injected into the view controller. The purpose in MVVM is to have the View Controller only responsible for view related logic and the view model is responsible for all things related to the interactions between the view and next layer up. In the case of this application the data will be stored directly inside the ViewModel in memory via the var fasts: [Fast] variable. But very easily we could introduce new code into the view model that could save the fasts to disk, send them to a web service, etc. All of this could be done without large modifications to the view model
Having a separate class just for the data interaction layer also allow us to test our application’s logic easily. Because the ViewModel is not concerned with UI related logic it does not depend on UIKit and we don’t need to test the UI just to test if our application logic is sound.
Create New MVVM Table View Controller and View
Inside your app directory create a few new groups:
- MVC
- MVVM
- View
- ViewController
- ViewModel
Move the current View and ViewController groups into the new MVVM group that you created
Right click on the MVVM/ViewController group and choose ‘New File’ > Cocoa Touch Class
Name your class FastingMVVMViewController. Subclass UIViewController and select create XIB.
Move the newly created FastingMVVMViewController.xib file into the MVVM/View directory and keep the FastingMVVMViewController.swift file inside of the MVVM/ViewController group.
Copy the contents of FastingViewController.swift into FastingMVVMViewController.swift since they will have similar logic (changing the class name to FastingMVVMViewController).
Open FastingMVVMViewController.xib inside interface builder, change the view to a table view, and connect the datasource, delegate, and tableView referencing outlet to the files owner like you did before.
Creating A ViewModel
Right click on the MVVM/ViewModel group and create a new file named FastingViewModel:
import Foundation

protocol FastingViewModelProtocol {
    var fasts: [Fast] { get }
    var hasFasts: Bool { get }

    func createFast(_ fast: Fast)
    func deleteFast(_ fast: Fast)
}

class FastingViewModel: FastingViewModelProtocol {
    private(set) var fasts: [Fast] = []

    var hasFasts: Bool {
        fasts.count > 0
    }

    func createFast(_ fast: Fast) {
        fasts.append(fast)
    }

    func deleteFast(_ fast: Fast) {
        guard let fastIndex = fasts.firstIndex(where: { $0 == fast }) else { return }
        fasts.remove(at: fastIndex)
    }
}Then go to FastingMVVMViewController and let’s make some updates:
class FastingMVVMViewController: UIViewController {
    private let cellId = "fastCell"

    @IBOutlet private weak var tableView: UITableView!

    private var viewModel: FastingViewModelProtocol

    required init?(coder: NSCoder) {
        fatalError("init(coder:) has not been implemented")
    }

    init(viewModel: FastingViewModelProtocol) {
        self.viewModel = viewModel
        super.init(nibName: nil, bundle: nil)
        self.title = "MVVM"
    }

    override func viewDidLoad() {
        super.viewDidLoad()

        configureTableView()
        configureHeaderView()
    }

    // MARK: - View Setup
    private func configureTableView() {
        tableView.register(FastCell.self, forCellReuseIdentifier: cellId)
        tableView.tableFooterView = EmptyStateView.makeView(title: "No Fasts Yet")
        tableView.tableFooterView?.frame = .init(x: 0, y: 0, width: 0, height: 150)
    }

    private func configureHeaderView() {
        let hostingController = UIHostingController(rootView: FastingTimer(
            fastEnded: { [weak self] fast in
                guard let self else { return }
                self.tableView.beginUpdates()
                self.tableView.insertRows(
                    at: [
                        .init(row: self.viewModel.fasts.count, section: 0)
                    ],
                    with: .automatic
                )
                self.viewModel.createFast(fast)
                self.tableView.endUpdates()
            }
        ))
        tableView.tableHeaderView = hostingController.view
        tableView.tableHeaderView?.frame = .init(x: 0, y: 0, width: 0, height: 420)
    }
}

extension FastingMVVMViewController: UITableViewDelegate {
    func tableView(_ tableView: UITableView, didSelectRowAt indexPath: IndexPath) {
        tableView.deselectRow(at: indexPath, animated: true)
    }
}

extension FastingMVVMViewController: UITableViewDataSource {
    func numberOfSections(in tableView: UITableView) -> Int {
        return 1
    }

    func tableView(_ tableView: UITableView, numberOfRowsInSection section: Int) -> Int {
        tableView.tableFooterView?.isHidden = viewModel.hasFasts
        return viewModel.fasts.count
    }

    func tableView(_ tableView: UITableView, cellForRowAt indexPath: IndexPath) -> UITableViewCell {
        let cell = tableView.dequeueReusableCell(withIdentifier: cellId, for: indexPath)

        // Configure the cell...
        let fast = viewModel.fasts[indexPath.row]

        cell.textLabel?.text = fast.dateString
        cell.detailTextLabel?.text = fast.elapsedString

        return cell
    }

    func tableView(_ tableView: UITableView, commit editingStyle: UITableViewCell.EditingStyle, forRowAt indexPath: IndexPath) {
        if editingStyle == .delete {
            let fast = viewModel.fasts[indexPath.row]
            viewModel.deleteFast(fast)
            tableView.beginUpdates()
            tableView.deleteRows(at: [.init(row: indexPath.row, section: 0)], with: .automatic)
            tableView.endUpdates()
        }
    }

    func tableView(_ tableView: UITableView, titleForHeaderInSection section: Int) -> String? {
        "Fasting History"
    }
}
Create Tab View Controller
Last but not least if we run our application now we will still only see our MVC view controller. Lets fix this by showing both of the screens that we created in a tabview!
Right click on your app directory and select New File > Cocoa Touch Class
Create a file called TabBarController subclassing UITabBarController and check also create XIB.
Open TabBarController.xib and click on ‘View’ in the Document Outline and press delete. Then click on the plus button in the top right corner of the Xcode window. Search for TabBarController and then drag it into the interface builder. In the identity inspector change the Class name to TabBarController.
Then open TabBarController.swift and lets add our view controllers as tab bar items:
import UIKit

class TabBarController: UITabBarController {

    override func viewDidLoad() {
        super.viewDidLoad()

        // Do any additional setup after loading the view.
        configureTabs()
    }

    func configureTabs() {
        let viewControllers = [
            UINavigationController(rootViewController: FastingViewController()),
            UINavigationController(rootViewController: FastingMVVMViewController(viewModel: FastingViewModel()))
        ]
        self.viewControllers = viewControllers
    }
}Last, go over to SceneDelegate.swift and set this TabBarController as the root view controller:
    func scene(_ scene: UIScene, willConnectTo session: UISceneSession, options connectionOptions: UIScene.ConnectionOptions) {
        // Use this method to optionally configure and attach the UIWindow `window` to the provided UIWindowScene `scene`.
        // If using a storyboard, the `window` property will automatically be initialized and attached to the scene.
        // This delegate does not imply the connecting scene or session are new (see `application:configurationForConnectingSceneSession` instead).
        guard let windowScene = (scene as? UIWindowScene) else { return }
        let window = UIWindow(windowScene: windowScene)
        window.rootViewController = TabBarController()
        window.makeKeyAndVisible()
        self.window = window
}Conclusion
Press Cmd-r to build and run your app and you will see now a tab view with both of the screens that you created.